

A Hero’s Journey Begins
The Legend of Zelda: Level 1 – The Eagle’s Nest
Greetings, fellow adventurers! Today, we embark on a quest through the mystical land of Hyrule, guided by the ancient prophecy. Our destination? The Legend of Zelda Level 1: The Eagle’s Nest. Grab your sword, don your green tunic, and let’s delve into this classic NES adventure! This guide will attempt to highlight some of the most important information to help you along the way.
Finding the Entrance
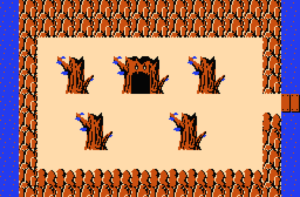
Our journey begins in the heart of the Hyrulian wilderness. To find the hidden entrance to The Eagle’s Nest, walk right a screen, up four screens, and then cross the bridge to the left. Traverse the perilous bridge until you encounter a screen with a solitary hollow tree among 4 solid trees. This tree stands as a silent sentinel, guarding the secrets below. Stand before it, raise your sword high and descend into the darkness, my friend, for therein lies our destiny.
The Enemies That Await You in The Legend of Zelda Level 1

As we step into the dimly lit corridors of The Eagle’s Nest, we encounter a motley crew of foes. Allow me to introduce you to our adversaries:
- Stalfos (Skeleton Warriors): These bony warriors wield swords in both hands. Wait for their attack, then strike when their guard is down. Remember, they’re relentless, so keep your wits about you! And here’s a pro tip: the Boomerang can stun them momentarily, giving you an advantage.
- Keese (Bat-Like Creatures): These nocturnal nuisances flutter about, seeking to drain your life force. Dispatch them swiftly with your blade. But wait! The Boomerang is your secret weapon here. It not only stuns Keese but also sends them spiraling into oblivion. Use it wisely, young hero!
- Zols (Gelatinous Blobs): These gelatinous blobs divide into smaller versions called Gels when struck. Keep slashing until they vanish entirely. Beware—they multiply like rabbits in springtime! Your sword is your best friend against these squishy foes.
- Goriya (Rodent-Like Rangers): These strong rodent-like humanoid creatures are armed with Boomerangs which will knock away life force when they hit you. Take heart though, a Magical Shield can deflect them.
Treasures Hidden Within The Legend of Zelda Level 1

Ah, the allure of treasure! Within the Eagle’s Nest, we discover several essential items:
- The Compass: To locate this invaluable tool, venture north, north, then eastward from the dungeon entrance. Enter the room, and there it lies, guarded by a group of Keese. The Compass reveals the location of the piece of the Triforce you are fighting to get to. Remember, knowledge is power! Consult it often to navigate the labyrinthine passages.
- The Boomerang: A weapon both practical and stylish! It lies north 3 screens and east one screen from the dungeon entrance. Use a bomb on the northern wall after walking north twice. Once you reach the room you’ll face a tough fight against 3 Goriyas. Defeat them and claim your prize—the Boomerang! Use it to stun enemies and retrieve distant items.
- The Map: Hidden within a secret chamber lies the dungeon map. You’ll have to travel north twice, and then make your own door with a bomb to the North. Defeat the Gels and you’ll find a piece of parchment. There, etched on ancient parchment, you’ll find the layout of The Eagle’s Nest. Study it well, for it reveals uncharted paths and hidden rooms.
- The Bow: Yes, dear readers, the fabled bow awaits you! Seek the northernmost chamber and then move west one room. Avoid the traps and move the western most block out of your way to enter the stairs. With this ranged weapon, you can shoot distant foes and activate far-off switches. Aim true, and may your quiver never run dry!
The Legend of Zelda Level 1 Boss: Confronting the Fearsome Aquamentus

And now, dear readers, we face the mighty boss of Level 1: Aquamentus, a formidable creature with a single horned head. Brace yourselves, for this beast has strengths and weaknesses aplenty:
- Strengths:
- Fire Breath: Aquamentus spews fiery projectiles in a predictable pattern. Dodge left or right to avoid them, or steady yourself behind your magical shield to block them. Timing is crucial!
- Unyielding Pursuit: When enraged, Aquamentus relentlessly tracks your movements. Keep your distance and sidestep swiftly! In reality, he just kind of moves up and down. Just avoid his fireballs and you’ll be fine 🙂
- Weaknesses:
- The Sword: Our trusty blade is our greatest asset. Stand at a safe distance and strike when Aquamentus lowers its head. Aim for the horn—it’s the most vulnerable spot.
- An explosive solution: The Bomb is your other option. Charge in quickly and plant a bomb near his head. This is a faster method than using your wooden sword.
- Remember, the Boomerang bounces off him harmlessly, so stick to the sword or bombs.
The Final Blow

As Aquamentus writhes in agony, seize the moment! Strike its horned head repeatedly until it collapses. Victory is yours! After he falls you’ll be rewarded with your first piece of the Triforce, and are on your way to freeing Pricess Zelda! You have defeated The Legend of Zelda Level 1,now it’s time to find Level 2!