
The Legend of Zelda Level 2 – The Moon: An In-Depth Exploration
Greetings, valiant Hyrule explorers! Today, we delve into the depths of Level 2 in the original NES masterpiece, “The Legend of Zelda.” This level, known as “The Moon,” offers a unique blend of challenges and treasures that will test your mettle and sharpen your wits. As your guide, I will provide an extensive walkthrough to ensure you emerge victorious.
Unveiling the Dungeon’s Veil – The Legend of Zelda Level 2
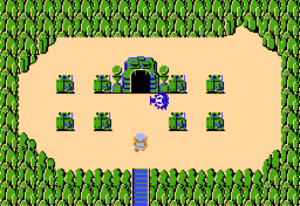
The journey to uncover “The Moon” begins in the Overworld, a place teeming with dangers and secrets. Starting from where your adventure begins, you will traverse right four screens, ascend two screens, venture right another two screens, climb up one screen, shift left a screen, and finally, ascend once more to discover the dungeon’s entrance. This path is fraught with adversaries, but with courage and determination, you shall reach your destination unscathed.
A Bestiary of the Moon

Within the stone walls of Level 2, you will encounter a menagerie of monstrous foes, each with their own lethal tendencies:
- Ropes: These serpentine adversaries may appear languid, but upon sighting you, they will charge with alarming velocity. Dispatch them with a swift stroke of your blade to reap the rewards they often yield.
- Gels: Do not underestimate these diminutive blobs; in great numbers, they can overwhelm. Strike them down swiftly to prevent their division and multiplication.
- Moldorms: These segmented beasts demand a strategic approach; each piece must be severed with precision. Your sword must dance with accuracy to vanquish these writhing threats.
- Stone Statues: These inanimate sentinels will assail you with fireballs. Remain vigilant and agile to evade their relentless barrage.
- Goriyas: These cunning creatures brandish boomerangs with deadly skill. Anticipate their throws, dodge, and counterattack in the brief moments of their vulnerability.
The Moon’s Hidden Treasures

As you navigate the labyrinthine corridors of Level 2, you will uncover invaluable treasures that will aid you in your quest:
- Compass: Nestled in a chamber with six Gels, the Compass lies waiting in the room. This indispensable tool will reveal the location of the fragment of the Triforce you are after.
- Dungeon Map: In the lair of five Gels, the Dungeon Map lies hidden. This chart will illuminate the full expanse of the dungeon, ensuring no corridor or chamber remains unexplored.
- Magical Boomerang: The Blue Goriyas guard this precious artifact. After defeating them, the Magical Boomerang will appear. This enhanced weapon flies with greater speed and covers the entire screen’s breadth, a formidable addition to your arsenal.
Confronting the Colossus: Dodongo

At the heart of “The Moon,” you will face the formidable Dodongo, a behemoth with an insatiable hunger for explosives:
- Strengths: Impervious to the steel of your sword, Dodongo can only be subdued by the strategic use of bombs.
- Weaknesses: Its voracious appetite for bombs is its undoing. Lure it into consuming these explosives to render it vulnerable, then strike with your sword while it is dazed.
- Tactics and Patterns: Dodongo’s movements are methodical and predictable, allowing you to place bombs with precision. Beware its charging onslaught and time your bomb placements with care.
Mastering the Moon
To ensure your triumph over The Legend of Zelda Level 2, heed these strategies:
- Ample Arsenal: Before engaging Dodongo, verify that your inventory is well-stocked with bombs.
- Impeccable Timing: Deploy bombs in Dodongo’s path as it advances toward you, ensuring it ingests them.
- Decisive Strikes: When Dodongo is stunned, seize the moment to deliver your sword’s decisive blows.
With this detailed guide, you are now fully prepared to conquer Level 2 – The Moon. March forth with valor, and let your adventure be marked by triumph and glory! Now it’s on to Level 3!